With VeraCore's Dynamic Reporting capabilities, you can create your own custom reports in the OMS, WMS, and PMA (Admin) systems.
Have questions about Dynamic Reporting before you get started? Read about dynamic reporting and get the answers you need here.
❇A
ccess to setup and generate Dynamic Reports is available only in the VeraCore Modern User Experience.For users in the client account (OMS), only users of the Default View will have access to create or generate dynamic reports. Pre-Registered Users in Additional Views or Shopping Cart Views do not have access to these menus.
Need to get a report to these users? Consider scheduling a report to
send automatically to a file location or email address.
Choose a Report Category
You're likely here because you have a specific reporting need. What are you reporting on? Think about what information you're looking to report. Is it related to products? Orders? User Access? Receipts? … something else?
For example:
"I want to see sales figures from the last 7 days of orders" (
Orders)
"I want to see the available balances for products that have been pulled, but the orders have not yet shipped." (
Products)
"I want to export my fulfillment billing invoices to my third party accounting system" (
Billing Data)
Think about the type of information you need to report. It will help you with the following steps.
Choose a System
Choose the system in which you'll create the report. Keep in mind that you can share the report across systems of the same type (i.e., a report created in one OMS can be shared with other OMSs.)
Each system type offers a different selection of report categories. Use the table below to determine whether your report will be created in the OMS, WMS, or PMA system.
Some categories belong to multiple system types. If you're unsure whether to create the report in the OMS or WMS, consider the type of information you're reporting and who will consume it.
| OMS | WMS | PMA |
- Products
- Orders
- Shipments
- Billing
- Access (users)
- Offers
- Names/Addresses
|
- Returns
- Billing (unit storage)
- Shipping
- Products
- Receiving
- Production
|
- VeraCore Feature Usage
- Accessorial Activities
|
Create the Report Record
Create the report record by choosing a report type or copying an existing dynamic report.
From Scratch
- In the chosen system, navigate to Define Dynamic Reports or Dynamic Reporting Set-Up.
- Click + in the top left corner.
- Expand the Report Categories on the left to view report types.
- Click a report type to preview a sample onscreen.
- Select the one you like. If your system has data, a preview of the report will display.
- Give your new report a name in the top left corner.
- Click Create Report at the bottom of the screen. The new report is created.
By Copying an Existing Report
- In the chosen system, navigate to Define Dynamic Reports or Dynamic Reporting Set-Up.
- Choose a Dynamic Report to copy.
- Click the Copy icon beside the report. A window appears.
- Type the name of your new report.
- Click Submit. The new report is created.
Build Report Columns
This is where you add the fields you'll want to see when the report is generated.
When you begin a new report, you're provided with a few columns to get started. You can add to those columns from the selection of fields on the left, remove unwanted columns from the report, rearrange them into the order you want, and hide or set some as optional.
Add Columns
The Data Selection Fields panel on the left provides an assortment of data fields you can add to the report.
- Click the Data Selection Fields panel on the left to open it.
- Expand data categories to browse for the desired data field.
- Click and drag it into place on the report.
- Drop the field onto the report.
Remove Columns
- Click the down pointer on the right side of that column's heading.
- Select Remove.
Rearrange Columns
- Click the column heading and hold.
- Drag left or right across the screen to the desired position.
- Drop it into place.
Hide a Column at Run time
Use this option when you want to filter or sort data by a field, but you don't want the field to display as a column on the report.
- Click the down pointer on the right side of that column's heading.
- Click Hide at Runtime.
Make a Column Optional
Use this option when you want to suppress a field from the default version of the report but allow users to opt to include it at run time. Or you can use this option to suppress the field from the generated version of the report but include it when the report is generated using the API.
- Click the down pointer on the right side of any column heading.
- Select Columns.
- Un-check columns you want to omit from the default version of the report, but leave available for users at run time and when the report is generated with the Dynamic Reporting API.
Format Individual Columns' Data
Edit individual columns to control their appearance including formatting date, money, and number fields.
Edit a Column Description
- Click the down pointer on the right side of the column heading.
- Click Edit.
- Click into the column heading.
- Type a new column heading.
Format Numeric Columns
- Click the down pointer on the right side of a numeric column heading.
- Hover over Number Mask.
- Decimal Places: Check the "Number of decimal places" box to add a decimal and two places after it to every number in the column.
- 1000 Comma Separator: Check the "Use 1000 comma separator" to add the 1,000 comma. Make sure it's unchecked for numeric ID fields, etc.
- Negative Values: Select Negative Value Options and then choose the option for displaying negative numbers. Choose from -123.22 or (123.22).
Format Money Columns
- Click the down pointer on the right side of a money column heading.
- Hover over Money Mask.
- Decimal Places:
- Check "Number of decimal places" to show dollars and cents.
- Leave "Number of decimal places" to show only whole dollars. Dollars and cents will be rounded down to whole dollars.
- 1000 comma Separator: Check the "Use 1000 comma separator" to add the 1,000 comma.
- Currency Symbol ($): Check 'None' to omit the dollar sign from the field. Check '$ Symbol' to include the dollar sign in the field.
- Negative Values: Select Negative Value Options and then choose the option for displaying credits or negative money. Choose from -123.22 or (123.22).
Format Date Columns
- Click the down pointer on the right side of a date column heading.
- Hover over Date Mask.
- Choose the way the date should display.
- 06/27/2016 4:01 PM
- 2016/06/27 4:01 PM
- 06/27/2016
- 2016/06/27
- 4:01 PM
- 16:01 PM
- June
- Monday
Select the Standard Output
Dynamic Reports can be generated in a standard spreadsheet format with distinct rows and columns or can be turned into Pivot tables. These instructions are for creating the standard version.
- Expand the Settings panel on the right side of the screen.
- In the Output section. verify that "Standard" is selected.
Filter the Data
Use filters to suppress unwanted records from showing on the report. You can filter by date, by yes/no/flag field, or by any data field.
How Filters Work
Report filters select or suppress records based on how a field in the record compares to a value you've set. For example, a report that should only show orders placed in the last 30 days would filter on the Order Date field and would only select orders where the Order Date is within the last 30 days. All orders that don't meet that criteria would be omitted from the report.
You can filter on date fields, yes/no/flag fields, or data fields.
Date Fields
(see Filter on Dates, below) | Select records based on some date in the report. You can choose to filter based on a date range, the last N days, a day of the week, a year, a month, time of day, etc. |
Yes/No/Flag Fields
(see Filter on Yes/No/Flag Fields, below) | Select records based on some flag type field (e.g., RUSH ORDER) being active or not.
For example, a report to show canceled orders will use the "Order Status - Canceled" field and select orders where that field = Yes. |
Numeric and Non-Numeric Data Fields
(see Filter on Non-Numeric Fields and Filter on Numeric Fields, below) | Select records based on the way the value in a selected data column compares to a specified criteria.
For example, a report to show orders placed in the consumer portal will use the View Description column as a filter, and will select all records where that field = "Consumer".
Or a report to show "Big Sale Orders" may select based on the "Total Merchandise Amount" column and select orders where the value in that column is greater than, say "$599.99". |
✎ Note
A field must exist as a column on the report to be used as a filter. Add the field from the options in the Data Selection Fields panel on the left side of the report setup screen.
If you don't want the field listed as a column on the report, click the down pointer in the column header and select Hide at Runtime.
Add Filters
- If you haven't done so, add the data field you want to filter on as a column in the report (see the note above.)
- Expand the Settings panel on the right side of the screen.
- Click the cog icon in the Data Selection Filters section. A window opens.
- Click + to add a filter. A line showing the first column in the report displays.
- Click the field name in the 'Column" column. Select the report column to use as a filter.
- Set filter criteria (see instructions by filter type below.)
- Designate whether users can change the filter criteria at run time.
- To allow them to change the filter criteria, select the unlocked padlock icon.
- To prevent them from being able to change the filter criteria, select the locked padlock icon.
- To allow them to see the filter on the report, click the eye icon so there is NO slash through it.
- To prevent them from even seeing the filter on the report, click the eye icon so that there is a slash through it.
- Repeat steps 4-7 to add additional filters. (e.g., filter by order date and then by source code to show all orders in a date range that came from a specific source.)
In the example below, we're reporting on all orders placed in the last 7 days through the VeraCore view/portal called "RunOne". Any order that doesn't meet both of these criteria will be omitted from the report.
Filter on Dates
| Date Range | Filter transactional records that occurred within the last N days.
- Select a date field in the 'column' field of the filter setup.
- Choose Date Range as the Filter Type.
- Set the number of days to include in the range (default is 30). The filter description displays.
- Override the description if needed.
|
| by Start Date | Filter transaction records that have occurred starting N days ago.
- Select a date field in the 'column' field of the filter setup.
- Choose Start Date as the filter type.
- Set the number of days for the report to start selecting data (default is 90, meaning the system will go back 90 days to find data). The filter description displays.
- Override the filter description if needed.
|
| by Closing Date | Filter transactions that occurred up until N days ago.
- Select a date field in the 'column' field of the filter setup.
- Choose Closing Date as the filter type.
- Set the number of days to for the report to stop selecting data (default is 0, meaning the system will select all records up to 'today' at run time; a value of 5 here would select all records up until "five days ago" at run time.)
- Override the description if needed.
|
✎ Note
You cannot filter on the same field twice. To filter on a date range with a specific start date and closing date, add the same Date field as a column twice to the report. Use the first instance for the start date and the second instance as the closing date (hide one or both at run time.)
Filter on Yes/No/Flag Fields
- Select a Yes/No/Flag type field in the 'column' field of the filter setup. This is a field that is typically a check box or a radio button in a record that, when selected, means the record has that characteristic. (e.g., Rush Order)
- In the Default Value field, select YES to include records that have this field checked/selected; choose NO to include only records that don't have this field checked/selected.
Filter on Non-Numeric Data Fields
- Select a data/list type field in the 'column' field of the filter setup. This is a field that has data in it instead of a date or yes/no option. (e.g,, Source Code Description.)
- In the 'Default Value' field, designate what value to look for in that field. (e.g., "Prevention Magazine") The report will select all records that have the value "Prevention Magazine" included anywhere in the Source Code field. Use a % by itself as a wild card to include all records that have ANY value in that field.
- Override the description if needed.
Filter on Numeric Data Fields
- Select a numeric data/list type field in the 'column' field of the filter setup. These are fields like Quantity, Number of Lines, Price, etc.
- In the Filter Type field, select how the record's value for this field should compare to your value. Choose between =, <> (not equal to), >, >=, <, or <=.
- Enter your value in the "Default Value" field.
For example, a filter that uses the 'Number of Lines' field, the <= filter type, and a value of '3' will select all orders that have three or fewer lines.
Sort the Data
Define how the rows will be sorted on the report. You can sort on up to three fields.
✎ Note
A field must exist as a column on the report in order to sort by it. If you don't want the field to be a column on the generated report, add the field, edit the column, and select Hide at Runtime.
- Expand the Settings panel on the right side of the screen.
- In the Sorting section, select a field to sort on. For example, select Order Date to sort the an orders report by order date.
- Select to sort in ascending order or descending order.
- Repeat steps 2 and 3 for additional sortation (e.g., Sort by Order Date and then by Order ID)
Set the Time Zone
Set the time zone to use when generating the report. This will affect the way records are selected when a date range is used and will affect the way transaction times are displayed.
- Expand the Settings panel on the right side of the screen.
- Twirl open the Time Zones section if necessary.
- Select whether to use the time zone that was set for the system generating the report ("Use System's Default Time Zone") or use the time zone of the user running the report at run time (Auto Detect From User's Device.)
Save the Report
- Click the floppy disk icon in the top right corner of the screen to save the report progress at any time.
- Choose whether to publish the report now.
- If you're not ready to publish/share the report, choose Save & Do Not Publish.
- If you're ready to publish the report, choose Yes, Save & Publish. The report will be shared with all user types in all systems of that type. Skip to Set Report Access/Permissions to learn how to restrict access to the report.
Test the Report
As you build the report, the screen will refresh to reflect your changes. So you're always previewing the report. To test the report generation, save it and then click the Play button (the right-pointing triangle) to generate it.
✎ Note
You'll need to save and publish the report (even if you only share it with this system for now) in order to test it. See Set Report Access/Permissions and Publish/Share the Report, below, for instructions.
Set Report Access/Permissions
If you publish the report without setting access, it will be available in all systems that match your system type (e.g., OMS) and to all users who have menu access to setup or generate Dynamic Reports.
✎ Note
You can set permissions without publishing the report just yet. Leave the "Published" box un-checked when you set permissions.
Or you can set permissions by system and/or user type.
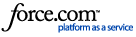
- Click the book icon at the top right corner of the screen.
- Select who can run the report (see options below.)
| Everyone | Publish the report to all of our systems of this type and make it available to anyone who has menu access to setup or generate dynamic reports. |
| Me & Administration Database Users Only | Publish the report to all of our systems of this type and make it available to me and to any other user who has access to the PMA (admin) system. |
|
Restrict by System &
Access Type
| Publish the report but restrict it only to certain systems and/or make it available only to certain user types. User types are determined by the menu access they're given when the user's view/portal in the OMS or user class in PMA are defined.
See instructions below for using this option. |
Restricted by System & Access Type
All Systems
Leave the Limit by System option un-checked
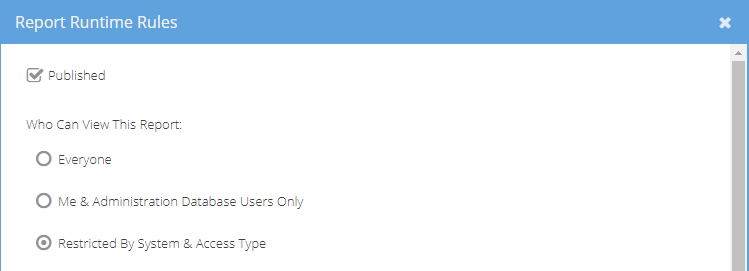
Limit to Selected Systems
- Check Limit by System
- Choose "Only Selected Systems" from the drop down list. A table of system names displays
- Click on any system name to add it to the list of selected systems that can use the report.
Limit to All But Selected Systems
- Check Limit by System
- Choose "All But Selected Systems" from the drop down list. A table of system names displays.
- Click on any system name to add it to the list of selected systems that cannot use the report.
All User Types
Leave the Access Type box un-checked.
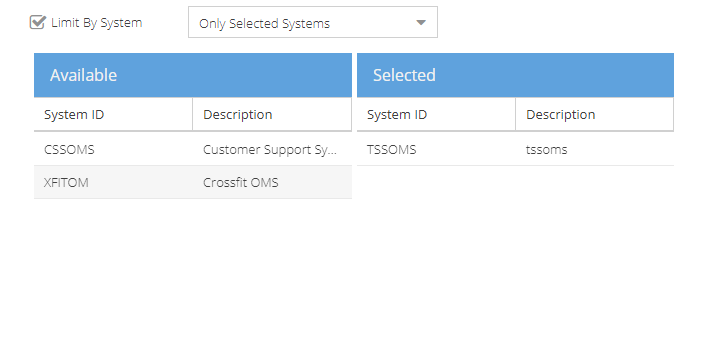
Restrict by User Type
- Check the Access Type box. A table of menu/access types displays.
- Give a user type access to the report by clicking the user type in the Available column to add it to the Selected column.
Publish/Share the Report
When the report is finished, make it available to generate by publishing it. There are a couple of ways to do this.
- Click the book icon in the top right corner of the screen. Check the "Published" box. Save your changes.
- Click the floppy disk (save) icon in the top right corner of the screen. Choose "Yes, Save and Publish".
Recommended Reading